Truck Ladder Racks
You can build truck ladder racks yourself and save big bucks. Brand-name truck racks are expensive. I looked at several popular brands and was surprised at how much they cost. Ladder racks seemed relatively simple, so why not build them myself?
I did some calculations and concluded that I could build custom truck ladder racks for about half the cost of brand-name racks.
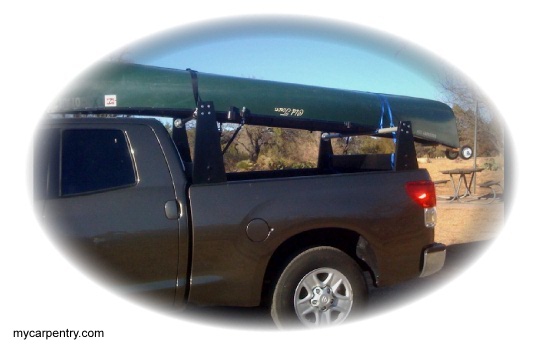
I built these racks specifically for a 2010 Toyota Tundra, but you can apply the same design concepts to your needs and change the dimensions to match your vehicle. Though I could use them as ladder racks, I built mine to be primarily canoe racks. My canoe weighs about 80 lbs. (36 kg.).
The goal was to design my custom racks so they would easily carry the weight of my canoe, plus anything else I might want to haul on top. I don't own a kayak, but I might someday; they typically weigh less than canoes, so they would also work for my future kayak. All of the ladders I own weigh less than my canoe, so as long as my racks can carry at least 80 lbs., I should be okay.
I had an overall vision of what I wanted. Here are a few key points:
- The racks needed to be easily removable.
- No holes drilled in my truck bed.
- The racks needed to be able to carry the weight of my canoe.
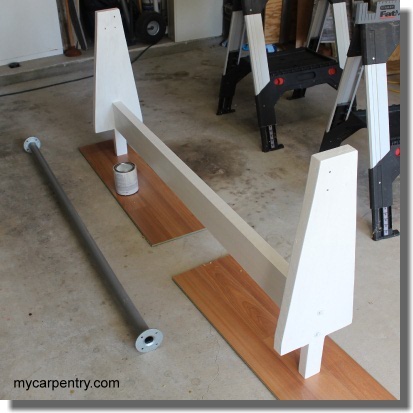
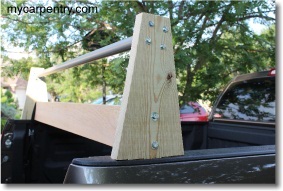
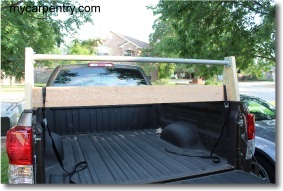
You may have noticed in the picture above that the back rack is lower than the front rack. I did this to make it easier for me to load my canoe. You can do this too, or you can make the back rack the same as the front rack, but keep in mind that whatever you plan to carry with these racks, there's not something extending below the horizontal bar that would dent the top of your cab. I designed my racks with close clearance.
Designing the Custom Truck Ladder Racks
While still in the envisioning stage of my ladder rack project, I went to the hardware store to educate myself on materials I might include in my design.
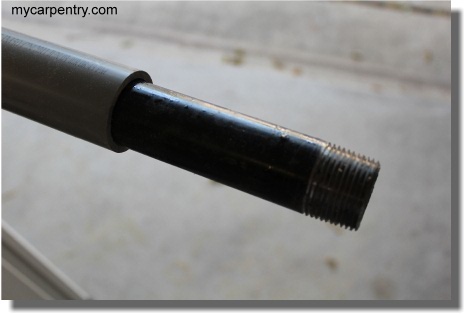
I concluded that I could use lengths of 1" diameter black plumbing pipe for the horizontal supports; they would be strong enough to carry the weight of my canoe. I also wanted a smooth surface to drag my canoe over, so that the gunwales would not get scratched; I discovered that a 1-1/4" PVC conduit would fit over the black plumbing pipe and provide a rolling surface for loading my canoe. The PVC pipe didn't roll on the plumbing pipe as I thought it might, but it was still a smooth surface and worked well.
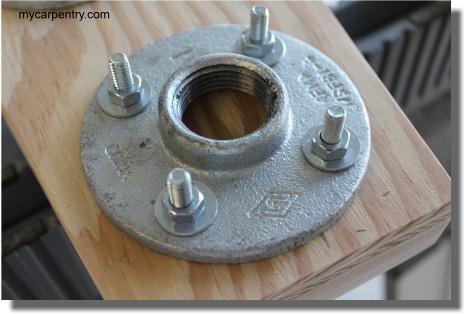
I could cut the plumbing pipe to length and thread it on both ends so that I could screw it into pipe flanges and bolt them onto wooden uprights.
That was the basic design of my truck ladder racks - horizontal pipe with flanges on each end, mounted to wooden uprights that fit into the stake bed holes of my truck.
Next, I needed to determine the size and shape of the uprights and the material I planned to use.
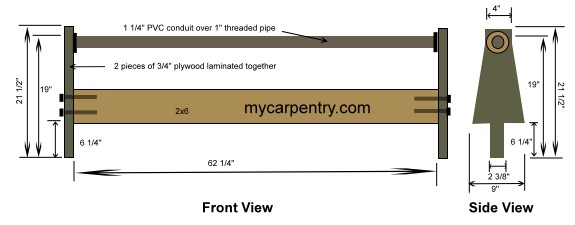
I made the back canoe rack first (as a proof of concept), using a scrap piece of 2x10 pressure-treated pine. The treated pine seemed strong enough and would probably work well, but I thought about the future and what might happen if the wood were to split and crack with age.
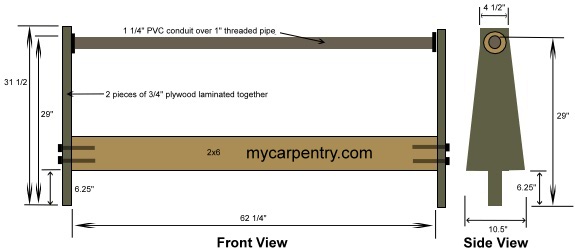
I built the front racks using two pieces of 3/4" plywood laminated together with wood glue, thinking that this choice of material would never develop a split and would probably be less likely to cup or crook.
Since I already built the back rack using pressure-treated pine, I didn't see the need to rebuild it using plywood (at least not now). I suppose that time will tell, and after a few years, I might even determine that pressure-treated pine works just as well, if not better, than plywood.
Building the Custom Truck Ladder Racks
The two diagrams below show the dimensions of the front (taller) and rear (shorter) racks. If you want the racks to be the same height, the front rack will also fit in the rear of your Toyota Tundra and visa versa.
Here is the list of the materials that I used to build both front and back racks:
- 2 sections of 1" steel pipe @ 61 3/4" long (threaded on both ends)
- 2 sections of 1 1/4" PVC conduit 61 1/2" long
- 4 galvanized pipe flanges (for the 1" pipe)
- 2 2x6 rough cedar planks @ 62 1/4" long (for the horizontal support)
- 8 5/16" lag bolts @ 5" long (to bolt the 2x6 cedar planks between the uprights)
- 8 5/16" washers
- 16 3/16" bolts @ 2 1/2" long
- 16 washers
- 16 3/16" nuts
- 1 quart of wood primer
- 1 quart of enamel paint
- 1 small bottle of wood glue
The material list above should cover everything except for the material used in the uprights, and that depends on the materials you choose to use (either 2x10 or plywood). If you are using 2x10, one 12' length should be enough to build either two "front" racks or one "front" rack and one "rear" rack.
If you choose plywood, one sheet of 3/4" (exterior grade) should be plenty of material to cut the eight upright shapes.
Truck Ladder Racks - Assembly
- Cut all of the upright parts using a table saw, circular saw, or jigsaw, choosing either method below, depending on which material you have decided to use, plywood or 2x10:
- a) - 2x10 - cut the 2x10 pieces to length, then cut them to the shape of the uprights as shown in the diagrams.
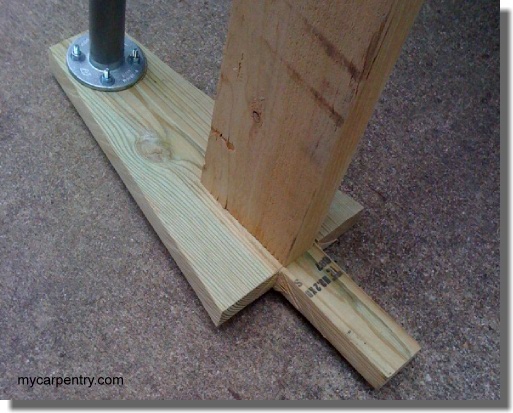
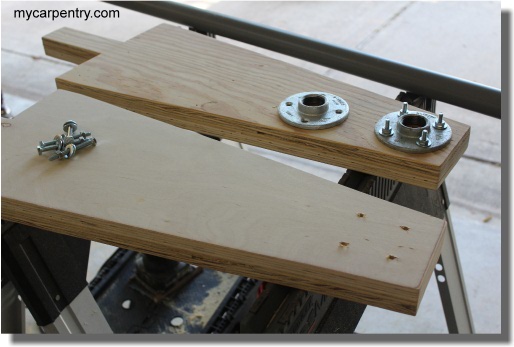
- b) - Plywood - cut out each upright shape. You will need two pieces for each upright. Laminate two 3/4" pieces with wood glue to make them into one upright that is 1 1/2" thick. (see below) Nail the plywood sections with 1 1/4" finish nails to hold them together until the glue sets.
- Sand the assembled sections of plywood (or pressure-treated 2 x 10) until all edges are smooth and free of splinters. While sanding the surfaces, be sure to round all the corners, particularly the posts that will fit into the stake bed holes of your truck. It will make them fit better.
- Position the flanges on the uprights at their specified location, use them as a template for marking the holes for the 3/16" bolts, and drill 1/4" holes in the uprights. (do not bolt them in yet)
- Place two uprights in opposing stake holes and measure the distance between them. On my truck, the measurement was 62 1/4", but yours will likely be different. This measurement is the length that you will cut the 2x6 cedar plank.
- Without removing the uprights from the stake bed holes, place the 2x6 cedar spacing plank between them and center it. Once it is centered, drill two holes on each outside end of the uprights for the 5" lag bolts. (see the diagrams for approximate location)
- Secure the uprights onto the 2x6 with the lag bolts and washers. Once secured, the rack assembly should easily slide in and out of the stake bed holes. If not, sand off the edges that are dragging and test again.
- At this point, all the wooden parts of the racks should be assembled and sanded.
- Apply the wood primer paint and the final exterior enamel paint as per the instructions on the paint cans.
- Place the 1 1/4" conduit over the 1" pipe and screw the flanges on both ends. Screw them in until they reach the same length as the 2x6 horizontal support.
- Once the paint has dried, bolt on the pipe assembly using the 3/16" nuts and bolts.
The assembled racks are now ready for placement into the stake bed holes on your truck. Use ratchet straps to secure the racks to the tie-down rings inside the bed.
Special Notes:
* The total weight that these racks can carry has not been tested. I only tested them with the weight of my canoe (approximately 80 lbs.) on three successful trips.
* When strapping down my canoe, I strapped it to the tie-down loops inside the bed, not the racks themselves. It is likely okay to strap the canoe exclusively to the racks, but I also strapped it to the tie-down loops. For me, it provided added security and peace of mind. I am still in the process of engineering the best tie-down scenario.
* The material you choose for the uprights is entirely up to you. In this tutorial, I compared plywood and milled lumber.
DIY Projects - Visit our DIY Projects page.
Woodworking Projects - Check out more woodworking projects on mycarpentry.com.
Carpentry Math - Math formulas commonly used in carpentry.
What next?
Leave Truck Ladder Racks and visit our home page.


