Rustic Wooden Chair
A Decorative Wood Craft Project
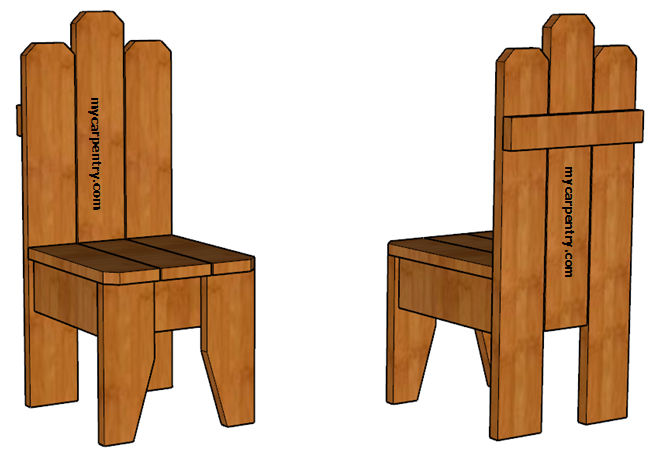
I made this rustic wooden chair from weathered fence boards and a small amount of nails and screws. This small decorative chair is not made for sitting but can function as a plant stand or a prop for holiday decorations. This woodworking project is easy to build and perfect for learning the woodworking skill.
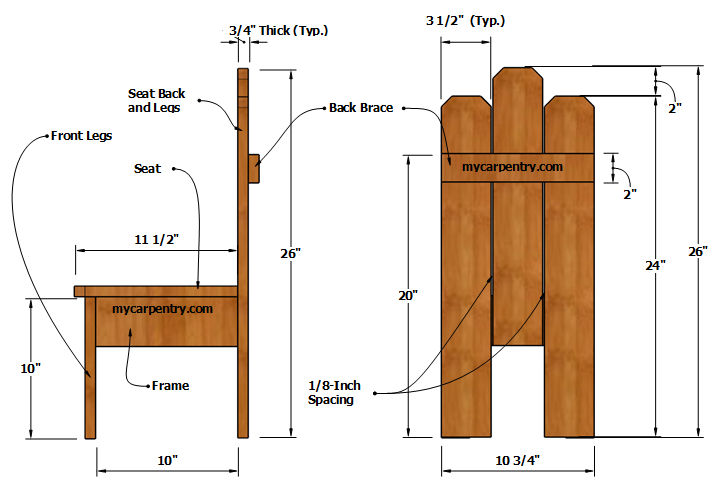
I assembled this wooden chair using a combination of 1.25" and 2" galvanized finish nails, but you can also use other fasteners as you see fit. The dimensions specified in the drawings assume a 1x4 to be 3-1/2 inches wide and 3/4 inches thick. The widths can vary between 3-1/2 to 4 inches. If you're materials don't match exactly, no worries. You can adjust the dimensions to work with the materials you have available.
Fall Craft Projects - Building the Wooden Chair
Materials List:
| Description | Size | Quantity |
| Back Rest / Legs | 1 x 4 x 24 | 2 |
| Back Rest (Center Piece) | 1 x 4 x 20 | 1 |
| Back Brace | 1 x 2 x 10-3/4 | 1 |
| Front Legs | 1 x 4 x 10 | 2 |
| Seat Frame (Front and Back) | 1 x 4 x 8-1/4 | 2 |
| Seat Frame (Sides) | 1 x 4 x 10 | 2 |
| Seat | 1 x 4 x 11-1/2 | 3 |
Rustic Wooden Chair Assembly
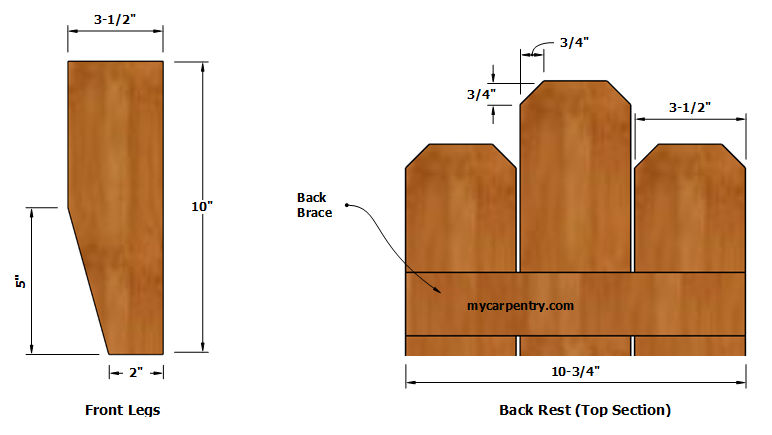
Cut the three seatback/leg boards and notch the tops, as shown on the details drawing.
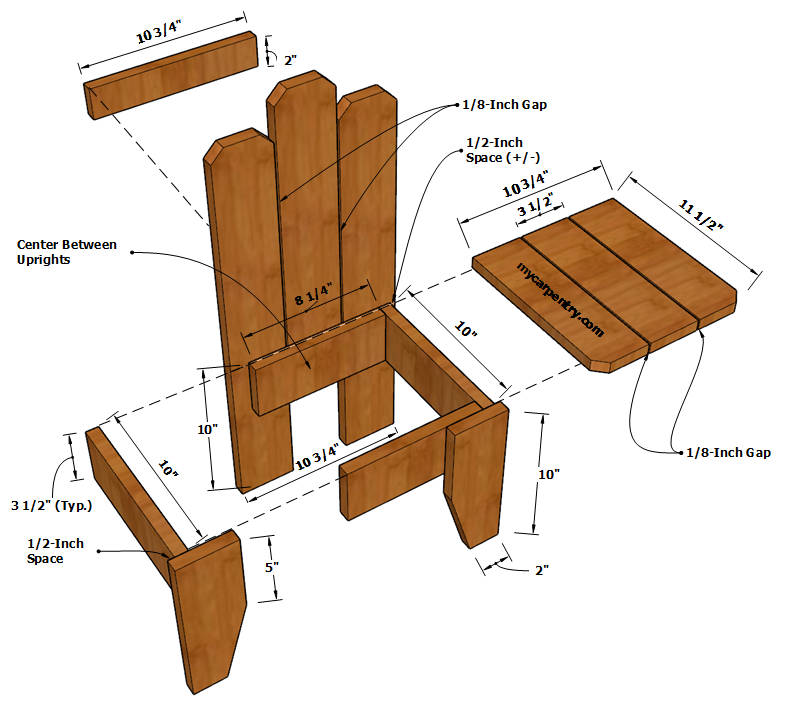
Lay them out side-by-side, 1/8 inches apart, on a flat surface (see drawings). If your 1x4s are 3-1/2 inches wide, the combined width of the three boards should be 10-3/4 inches. If not, note the actual width and cut the 1x2 back brace that width.
Square the back brace with the three 1x4 uprights and fasten the pieces using galvanized nails or screws.
Cut the four pieces of the seat frame. Be sure to make any necessary adjustments to the lengths so that the finished width of the seat frame is about 1 inch less than the seatback.
Assemble the frame parts using nails or screws and fasten the frame to the seatback - ensure it is centered side-to-side on the seatback and that the top of the frame is 10 inches from the bottom of the back legs.
Cut and notch the two 10-inch front legs and fasten them to the Seat Frame as shown in the drawings. They should be spaced apart at the same distance as the back legs when attached to the seat frame.
Cut the three 11-1/2-inch seat boards and fasten them to the frame, notching them as indicated in the drawings.
I hope you enjoyed making this rustic wooden chair. If you have any questions or suggestions, please don't hesitate to contact us.
Easy Craft Ideas - Check out the Easy Craft Projects on mycarpentry.com.
Bird Feeders - Check out the Bird Feeder Projects on mycarpentry.com.
Birdhouse Plans - Check out more birdhouse plans on mycarpentry.com.
Woodworking Projects - See more woodworking projects on mycarpentry.com.
What next?
Leave the rustic wooden chair and visit our home page.


