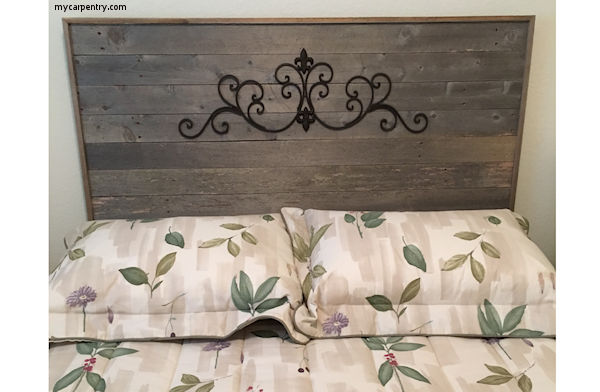
DIY Headboard
Build a Custom Headboard for Your Bed
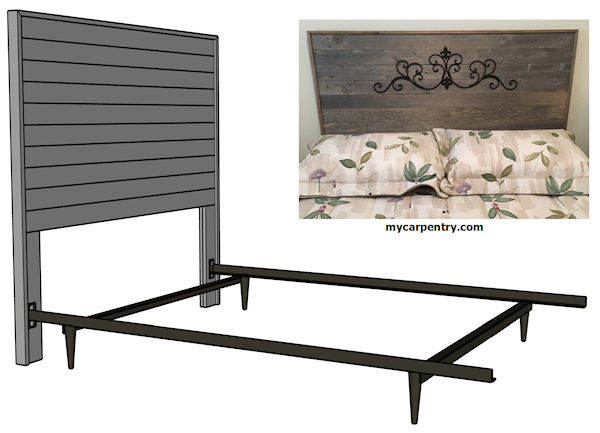
DIY Headboard - How to make a headboard, save money, and add a new custom feature to your home. Our guest room had a box spring and mattress on top of a steel bed frame. It was functional but short of attractive. Adding a custom DIY wood headboard was the perfect solution.
My full-size self-supporting steel bed frame didn't require a structural headboard - all I had to do was make a headboard that could be attached to the head end of my existing metal frame. The goal was to build a simple rustic reclaimed wood headboard that would match some rustic picture frames we had hanging in the room.
I used some 1x4 fence boards that I saved after I recently replaced my privacy fence. If you don't have any fence boards of your own, there's always someone replacing a wooden fence. The only costs of the project were the fasteners that were required (a handful of wood screws and four carriage bolts).
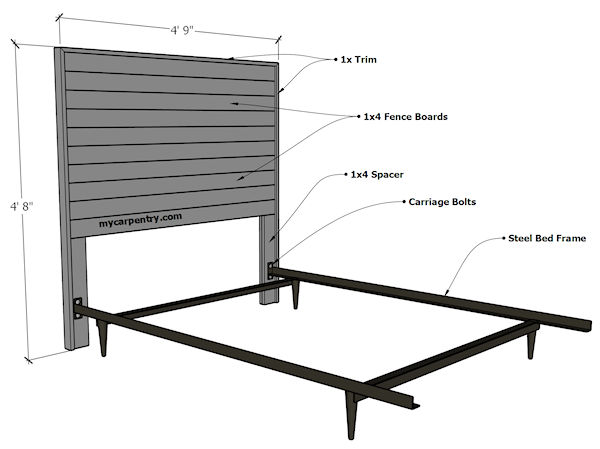
The dimensions of the headboard shown on this page are mainly for reference. The steel bed frame's headboard mounting holes could vary between manufacturers. In preparation for building your headboard, take measurements directly from the steel frame you plan to use. The finished width of my headboard was roughly 4' 9" wide (for my full-size bed frame). The finished height was 4' 8", but that was simply a matter of preference.
DIY Headboard - How to Build a Headboard
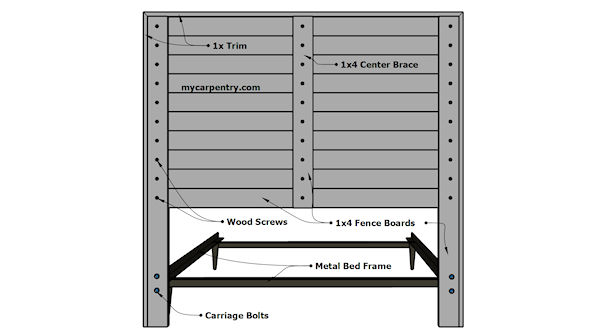
Measure the distance between the center of the mounting holes on your free-standing metal frame. This measurement will determine the spacing of the two end braces and the lengths of the horizontal slats. The span between the mounting holes on my full-size metal frame was 52". I wanted to mount the two ends of the metal frame to the lower center of each end brace. My 1x4 rustic reclaimed wooden fence boards were actually 3.5" wide, making the center of each end brace 1.75" from each edge of the board. To determine the lengths of the 1x4 horizontal slats, I added all of these numbers together - the span between the holes on the metal bed frame plus the two outer edges of the end braces (52" + 1.75" + 1.75" = 55.5").
After I added the trim to the two sides (and top), the overall width became 57" or 4' 9" (as indicated in the drawings).
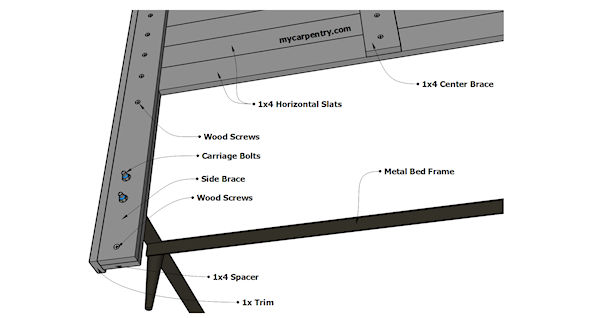
Once I determined the lengths of my horizontal slats (55.5"), I cut 10 of them and laid them best-side-down and side-by-side on my garage floor. I aligned the ends of the slats with a framing square and screwed the two end braces into each slat with wood screws (that were short enough not to poke through the front side of the slats). Next, I added a center brace to keep the slats aligned. Finally, I added a 1x4 spacer to the bottom of each end brace (to fill in the space below the slats).
I did not add slats to the bottom of my DIY headboard; they wouldn't be visible once I added the box spring and mattress - save the material for another project.
To finish the DIY headboard project, I ripped some 1x4 fence board material down to 2 1/4" to trim the two sides and top. I mitered the connecting points and nailed them with finish nails to the new rustic headboard.
You can finish the wood many ways, but I left my cedar fence boards naturally weathered.
Once I completely assembled the DIY headboard, I aligned the two legs (end braces) onto the two ends of the metal bed frame. I marked the location of the carriage bolts with a pencil and drilled 1/4" holes through the legs of the headboard. Finally, I attached the new rustic headboard to the steel frame using the four 1/4" carriage bolts and washers.
It is worth mentioning that you don't have to use reclaimed wood for your DIY headboard. You can purchase any wood species available from your local building supply store.
This DIY headboard project was an easy-to-build design, but you can add your headboard ideas to make it unique. We decorated our wooden headboard with local metal art as a finishing touch. Enjoy.
If you don't have a free-standing frame, you can shop for them on Amazon (or any other place that sells bed frames) to compare the availability of styles and sizes.
Woodworking Projects - See more woodworking projects on mycarpentry.com.
DIY Projects - Check out more DIY projects on mycarpentry.com.
Outdoor Furniture Plans - Learn about our outdoor furniture plans.
What next?
Leave DIY Headboard and visit our Home Page.


