Chickadee Birdhouse Plan
Our chickadee birdhouse plan is to be used by chickadees, but wrens, titmice, and house finches might find it suitable for nesting. You can cut most of the pieces of this birdhouse from a 6-foot 1x6 (3/4" x 5 1/2") fence board, but you will need a 1-foot section of 1x8 for the front and back roof sections.
Materials List:
- 6-foot 1x6 (3/4" x 5 1/2") cedar or redwood fencing plank
- 1-foot 1x8 (3/4" x 7-1/2") scrap cedar or redwood for the roof sections
- Eye Bolts (2) - (for hanging wire)
- Hinges (2) - 1" x 1" (galvanized)
- Galvanized Finish Nails/Screws
- Screw Hook (to latch the cleanout door)
- Exterior Wood Glue
- Eco-Friendly Paint (Optional)
Tools:
- Saw (Circular or Miter)
- Hammer
- 3/8-inch Drill/Bits
- Paddle Bit - 1-1/8"
- Screw Driver
- Square
- Carpenter's Pencil
- Tape Measure
Birdhouse Parts List
| Description | Size | Quantity |
| Base | 3/4" x 4" x 4" | 1 |
| Front | 3/4" x 5 1/2" x 12-3/16" | 1 |
| Sides | 3/4" x 4" x 12" | 2 |
| Back (Upper Fixed) | 3/4" x 5-1/2" x 3" | 1 |
| Cleanout Door (Hinged) | 3/4" x 5-1/2" x 7-7/8" | 1 |
| Front Roof | 3/4" x 7-1/2" x 3" | 1 |
| Back Roof | 3/4" x 7-1/2" x 7" | 1 |
Chickadee Birdhouse Plan
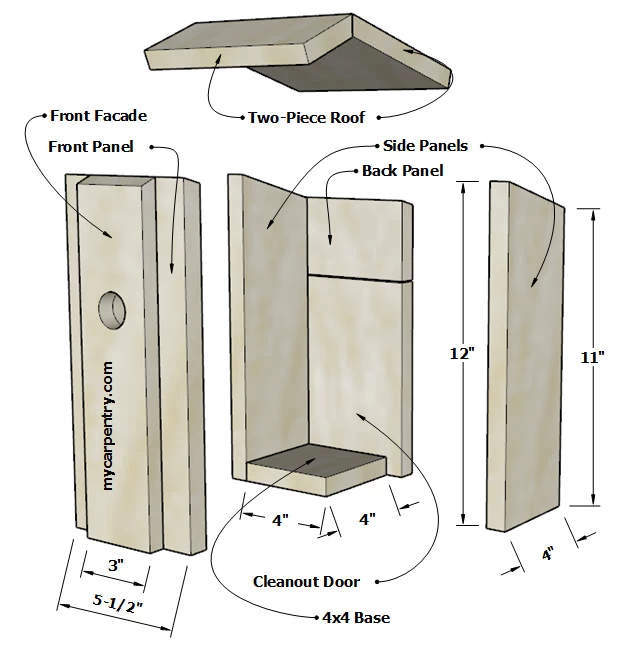
- From the 6-foot piece 1x6 (3/4" x 5 1/2"), trim off just enough wood to square the end of the board, and cut the 4" x 4" base. Drill four 1/4-inch drain holes near the corners.
Building the Chickadee Birdhouse
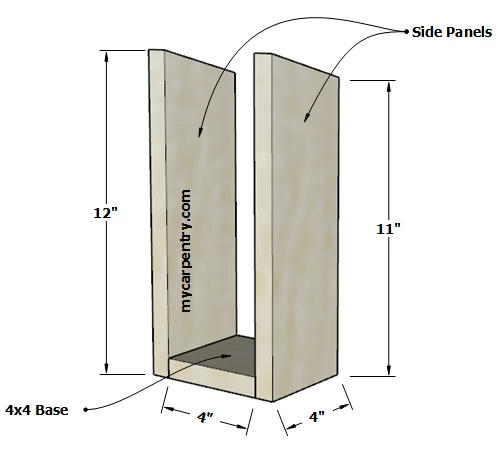
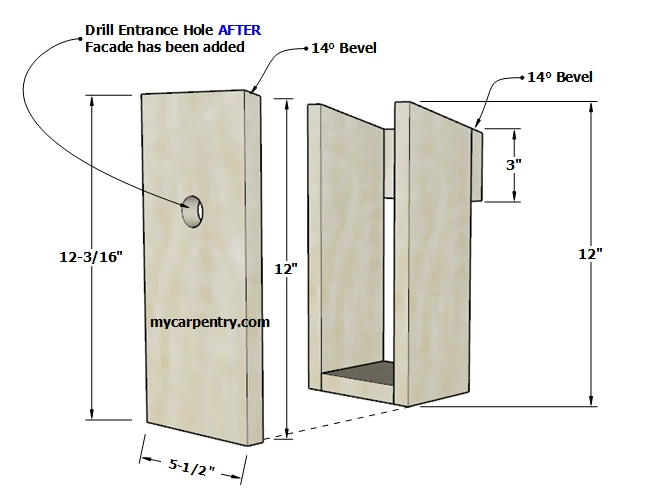
- Cut the two identical side panels as indicated in the drawings.
- Attach the two side panels to the 4x4 base, as shown below, using the fasteners of your choice. I use a combination of exterior wood glue, galvanized finish nails, and screws.
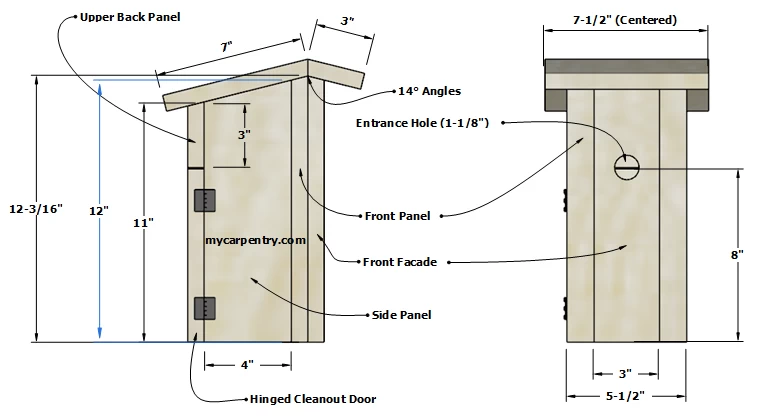
- Cut the Front Panel: From the square end of the 1x6, measure 12-3/16" and mark it square. Set the bevel angle on your saw to 14° and cut along this line. This will be the long point of the 14° angle. Once cut, the short-point of the Front Panel should be 12" from the bottom end so that, once attached, it will match the 12" edges of the two Side Panels.
Ignore the Entrance Hole shown on the Front Panel in the drawing below. You will drill it through the Front Facade and Front Panel in a later step.
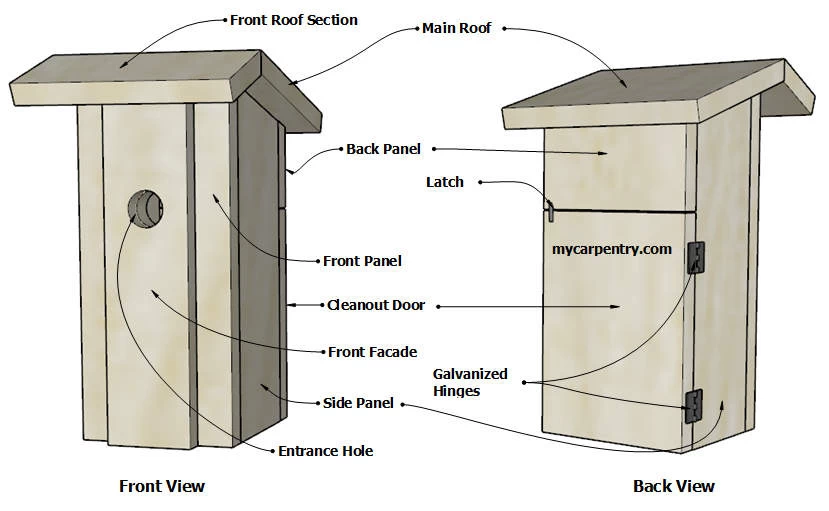
- Cut the 3-inch long upper back panel from the 1x6, with a 14° bevel angle on one end and square on the other, and attach with the long point edge flush with the back of the two Side Panels. (see drawings)
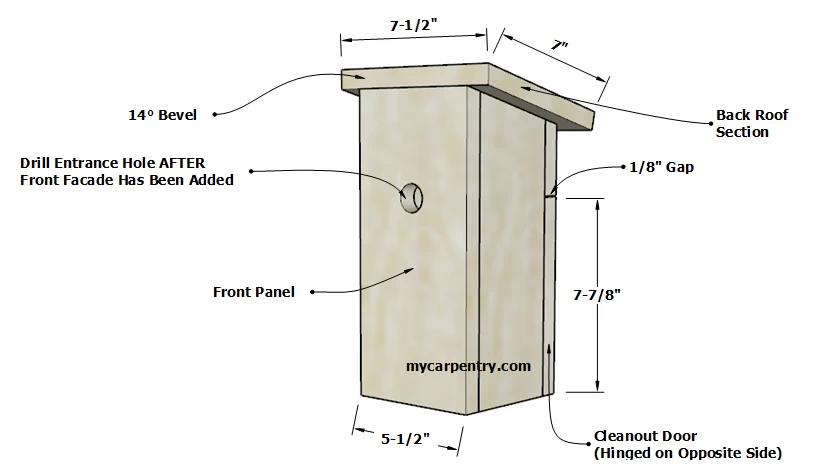
- Cut the back Roof Section: From the piece of 1x8 material, measure 7" from the square end and cut another 14° bevel angle. Secure it to the chickadee birdhouse so that the face of the beveled edge aligns with the face of the Front Panel. (see drawings)
- The opening for the Cleanout Door should be roughly 8" tall. If this is the case, cut the Cleanout Door from the 1x6 7-7/8" long (square end to square end) so that after installation, there is a 1/8-inch gap between the upper Back Panel and the top of the Cleanout Door.
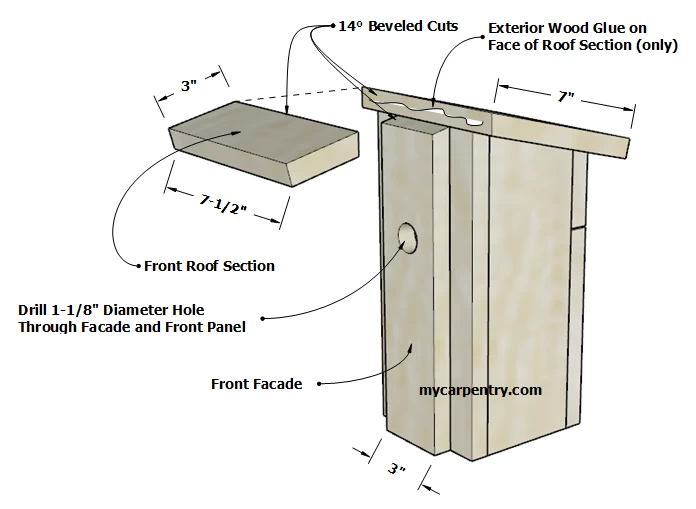
- Attach the Front Facade with galvanized screws so that it can be replaced (if needed) at a later date. Do not nail or glue the Front Facade to the Front Panel (unless you know you will never replace the Facade).
- Glue and attach the Front Roof section to the back roof section using a combination of glue, screws, or nails. Do not glue the Front Roof to the top of the Facade.
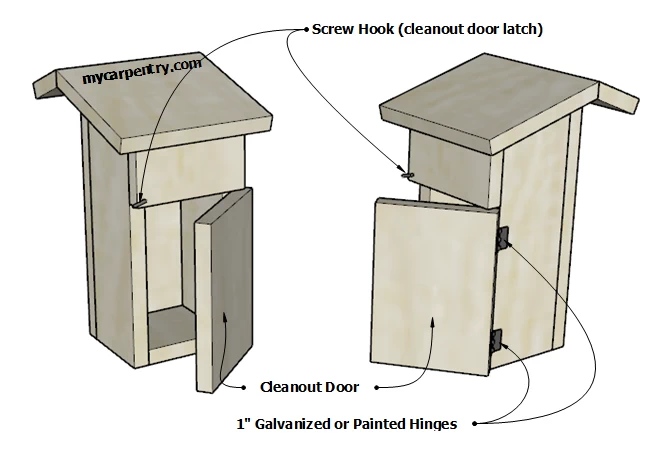
- Attach the Cleanout Door using the two 1-inch galvanized hinges and screws. Use the Screw Hook as shown in the drawings as a latch for the Cleanout Door.
Success!
The cleanout/observation door makes cleaning the birdhouse easy and provides access for non-disruptive bird observation. Slowly rotate the locking screw and ease the access door open so that you do not disturb the nesting bird.
About Chickadees
There are many varieties of chickadees in North America. They often nest in natural cavities, abandoned woodpecker nests, or nest boxes. Carolina chickadees are the most common in Texas, with one brood and a clutch size of up to 10 eggs. Chickadees nest near the edges of woodlands and prefer nest boxes mounted 5-20 feet above the ground.
Birdhouse Maintenance
Every year in January, we clean out the old nesting materials from each of our 13 birdhouses. It is not uncommon to discover a wasp nest attached to the ceiling of the birdhouse. All the wasp nests in our birdhouses were old and abandoned except one. We found nearly a dozen wasps huddled together on the top of their old nest. When we disturbed them, they crawled aimlessly on the ground and were not aggressive, as they often are in the spring and summer. We removed the wasp nest and the disoriented wasps and brushed liquid soap on the upper inside of the birdhouse to prevent the next season's wasps from starting a new nest. We have not tried this before - hopefully, that will do the trick!
Painting a Birdhouse
If you plan to paint your birdhouse, use nontoxic, eco-friendly paint that does not produce airborne emissions called VOCs (Volatile Organic Compounds). Use natural colors that do not absorb heat. Do not paint the interior surfaces of the birdhouse where the birds build their nests.
Protect your Birdhouse from Predators
The methods you use to protect your nesting birds from predators depend on how you mount the birdhouse. If you install it on a pole, you can purchase or construct a shrowd that prevents critters from climbing up.
Visit Texas Birding on RVweekends.com to see photos of some of the birds we have seen during the bird migration seasons.
Visit eBird to learn more about birds and discover the world of birding.
Birdhouse Plans - Check out all the birdhouse plans on mycarpentry.com.
Woodworking Projects - Check out the woodworking projects on mycarpentry.com.
Outdoor Bench Plans - Build an outdoor bench for studying nesting birds.
What next?
Leave Chickadee Birdhouse Plan and visit the mycarpentry.com home page.


